# IP Core support
Moku Cloud Compile also supports the inclusion of IP cores in your custom designs. These IP cores can be selected from our library of pre-compiled IP cores with the flexibility to add your own customized IP core from AMD Xilinx™.
# Pre-compiled IP Cores
The Moku library consists of eight pre-compiled IP cores optimized for arithmetic, filtering, waveform generation, and correlation analysis, all fully compatible with Moku:Go, Moku:Lab, Moku:Pro, and Moku:Delta hardware. These cores can be instantiated either in your VHDL or Verilog codes and simplify common digital signal processing tasks in your customized code. The supported IP cores are as follows:
| Supported AMD IP Core | Description | Template and Example |
|---|---|---|
| Adder/Subtractor Adder/subtractor v12.0 (opens new window) | Add or Subtract two numbers | |
| CIC Decimation (by 8) CIC compiler v4.0 (opens new window) | Decimate the input data by a factor of 8 | |
| CORDIC Transformation CORDIC v6.0 (opens new window) | Use CORDIC computation for rectangular to polar conversion | |
| Counter (32-bit) Binary Counter v12.0 (opens new window) | A binary counter that counts on every clock tick | |
| FFT (1024 points) Fast Fourier Transform Core v9.1 (opens new window) | Performs a Fast Fourier Transform of 1024-points data frame | |
| FFT (65536 points) Fast Fourier Transform Core v9.1 (opens new window) | Performs a Fast Fourier Transform of 65536-points data frame | |
| FIR filter (7 coefficients) FIR compiler v7.2 (opens new window) | Generates a FIR filter with 7 taps | |
| Sine Generator (48-bit) DDS Compiler v6.0 (opens new window) | Generates a sine wave that takes in a 48-bit frequency |
An example is shown below to use the Adder IP Core
The instantiation templates for the IP cores are available in the GitHub repository (opens new window) with support for both VHDL and Verilog.
# Uploading your own IP core (using .xci file)
Users can also add their own IP cores that are generated from AMD Xilinx Vivado™ and utilize them in Moku Cloud Compile to build their customized logic. This can be done by uploading an .xci file that holds information of the desired IP core. Note that this requires the user to be using the Vivado software with the key FPGA part as shown in the Table.
| Hardware platform | FPGA model number |
|---|---|
| Moku:Go | xc7z020clg400-1 |
| Moku:Lab | xc7z020clg484-3 |
| Moku:Pro | xczu9egffvc900-2 |
| Moku:Delta | xczu47dr-fsvg1517-2-e |
Vivado™ compatibility
When generating the .xci file of your IP cores, please use Vivado 2022.2™. Using an .xci file from any other version of Vivado software can result in a failed synthesis.
The below steps encapsulate the process of obtaining the necessary files from Xilinx Vivado™ to deploying on the Moku.
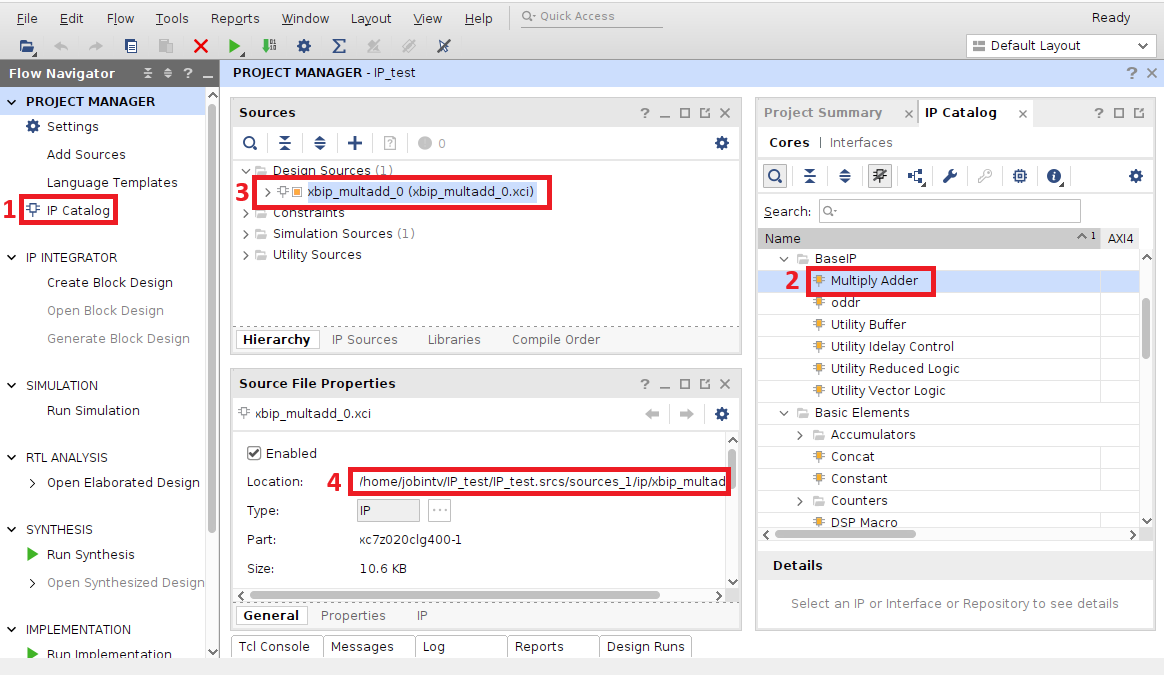
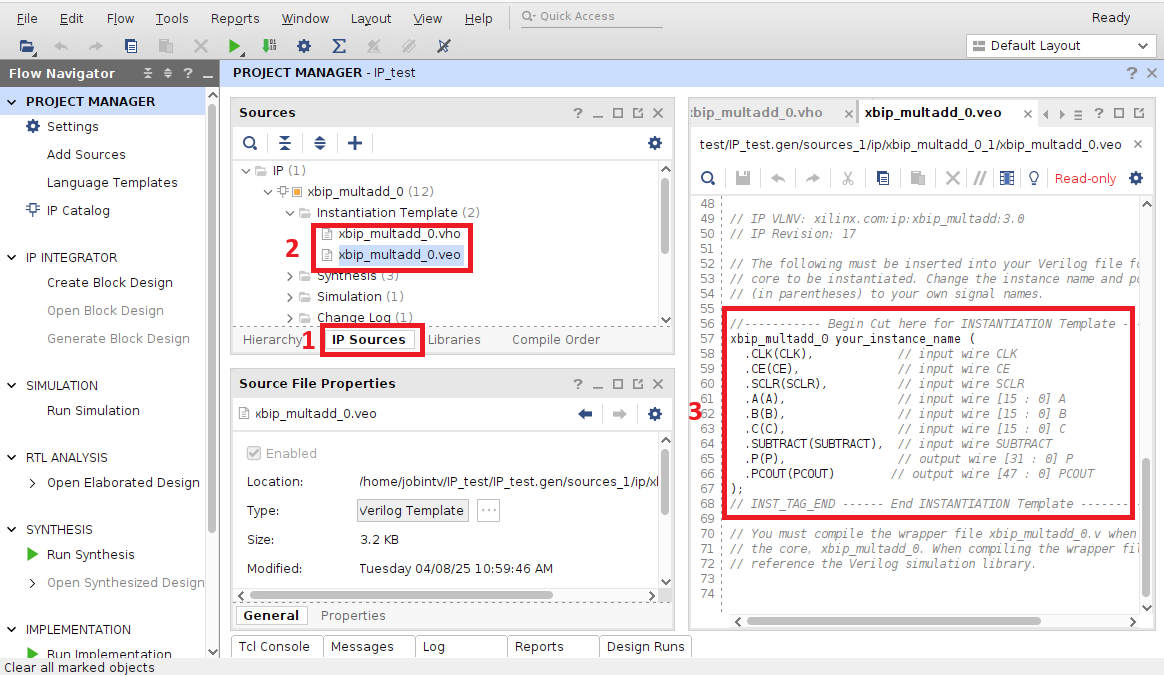
Step 1: In the Project Manager of Vivado, select the IP Catalog and choose the desired IP core. Set the parameters for the IP core and generate outputs. After clicking on the Generate outputs prompt, the sources will be updated with the corresponding .xci file with details on the file location in the Properties tab.
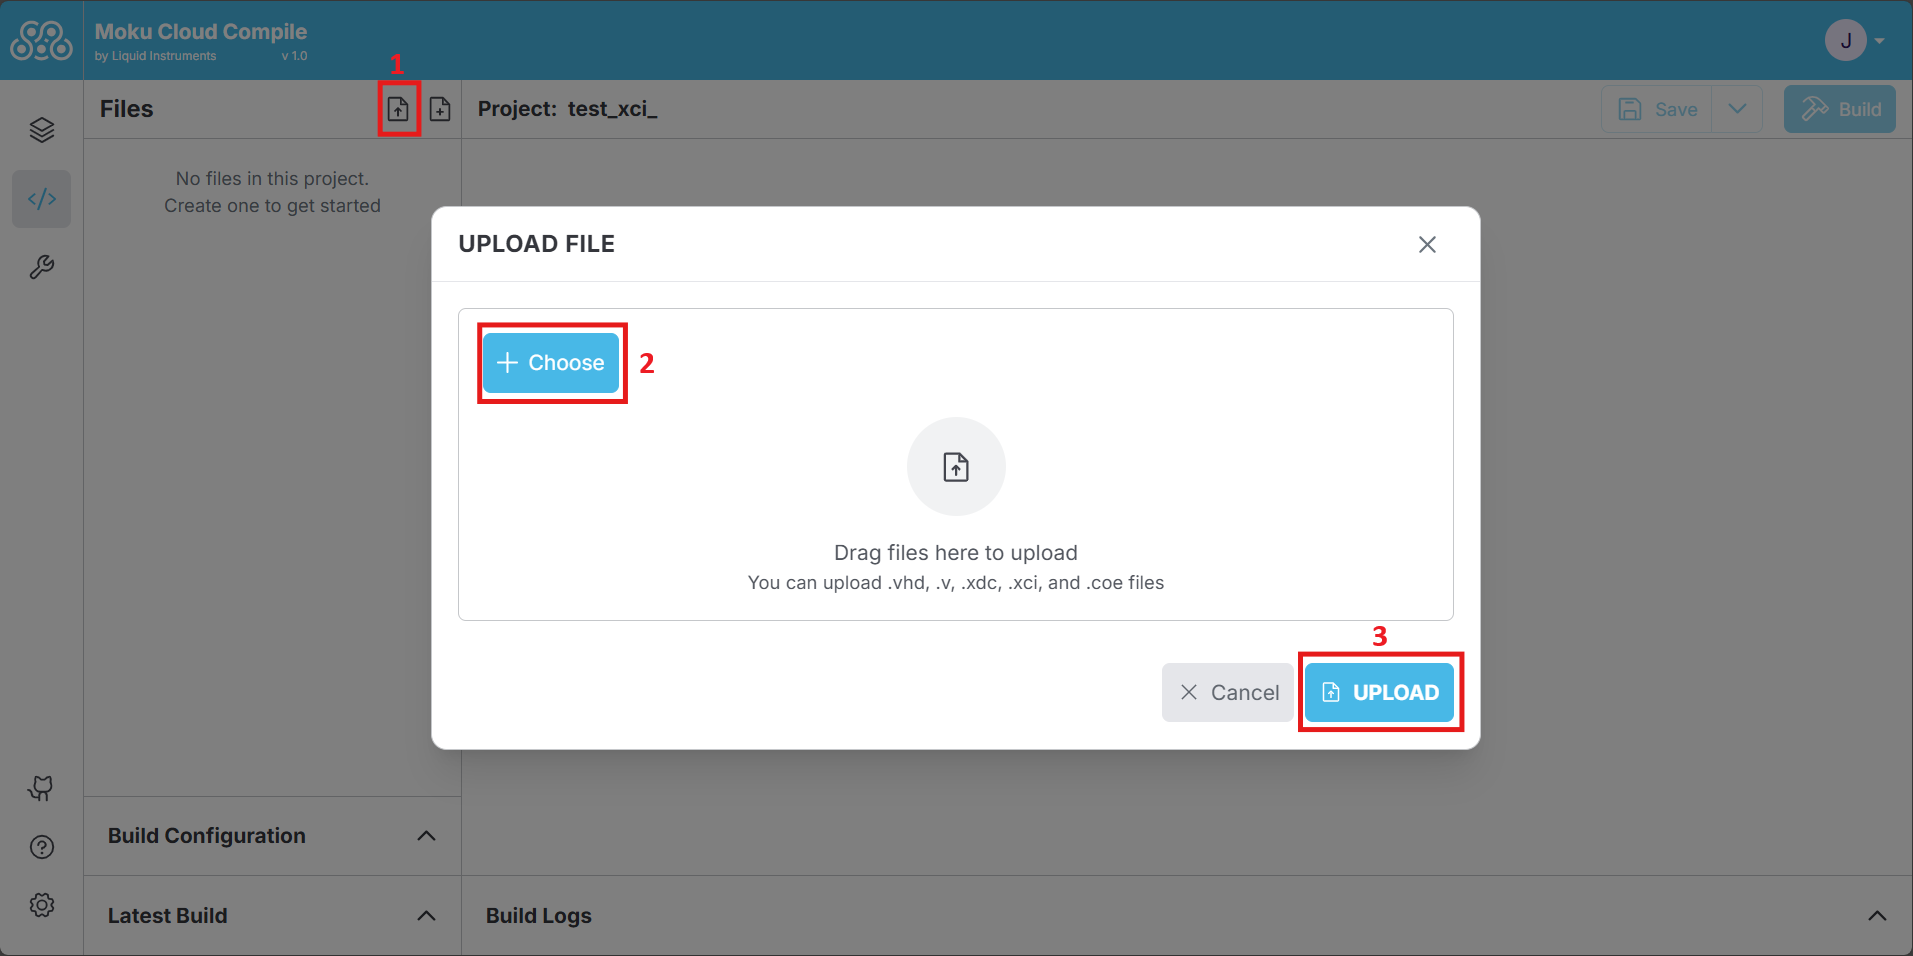
Step 2: Upload the XCI file with the IP name found in the last step, i.e. xbip_multadd_0.xci, and if applicable the coefficient file, i.e. xbip_multadd_0.coe, to your Cloud Compile project. These files can be found in the project directory as shown in the previous step.
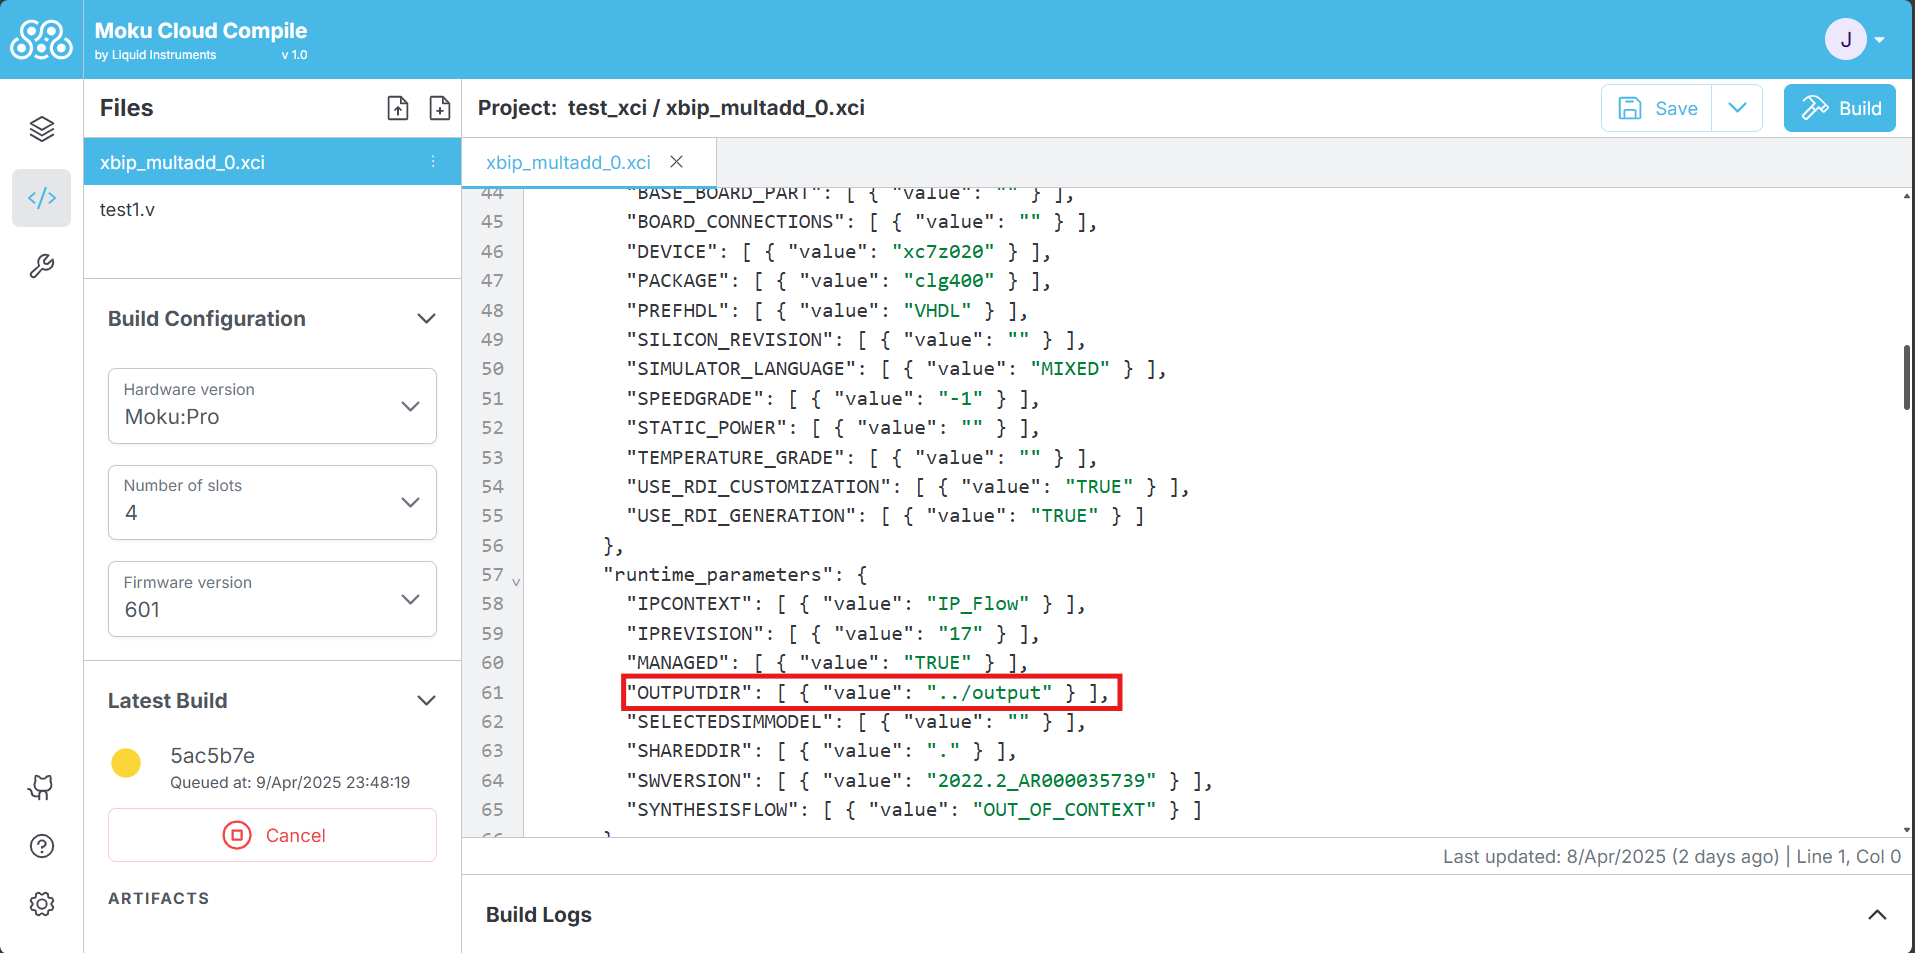
Step 3: After uploading the file, edit the XCI file, i.e. xbip_multadd_0.xci, by locating "OUTPUTDIR" and change the value to "../output".
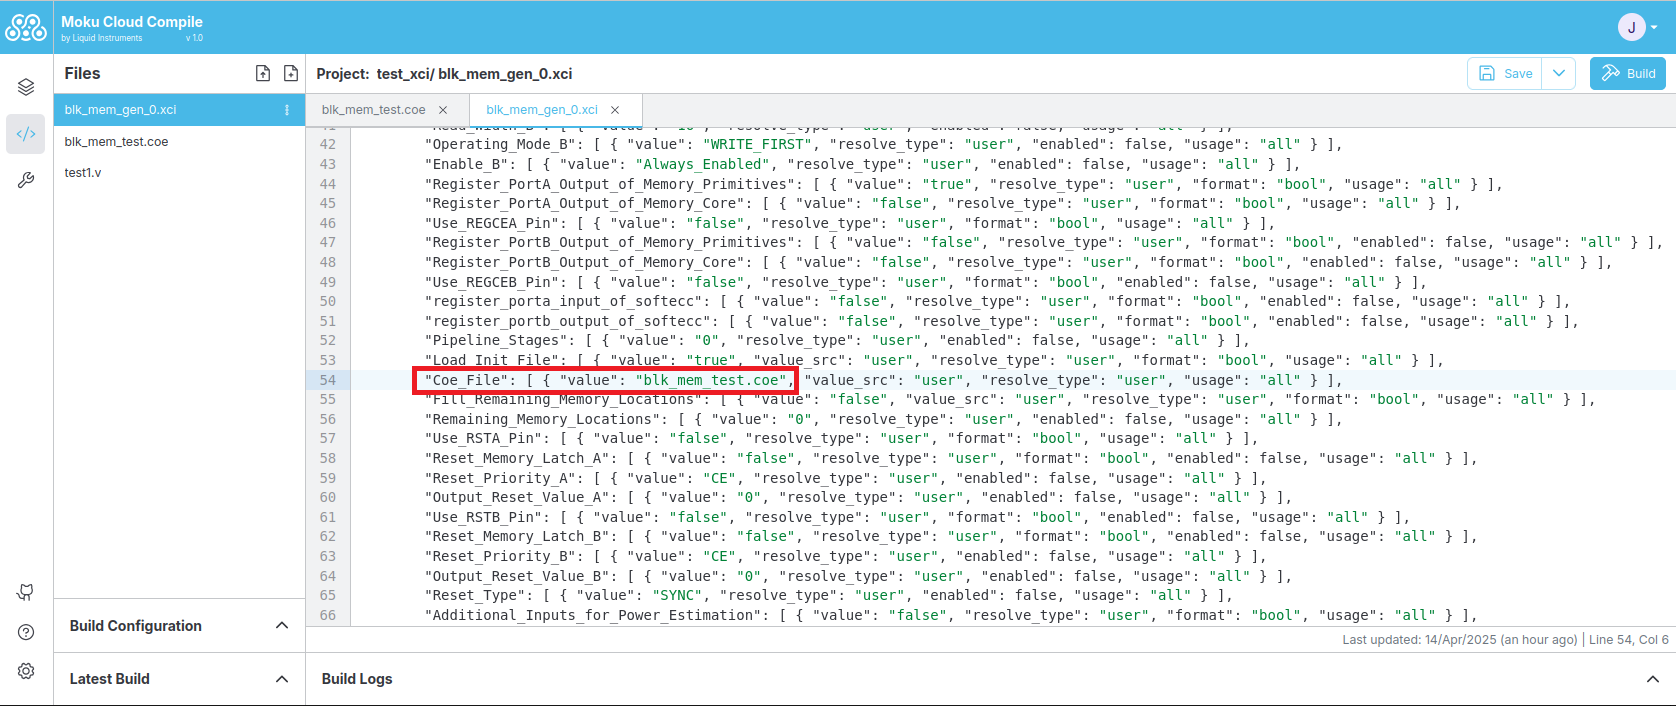
Optional Step: If the IP core utilizes user-defined coefficients using a COE file, an additional change may be required. Edit the XCI file by locating "Coe_File" and change the value to "Coe_filename.coe", without any additional directory path.
Step 4: Vivado also generates .vho or .veo files (found within the IP sources tab in Sources on Vivado) from which the instantiation template can be obtained. Use this template to assist you in including your IP core in your customized logic in Cloud Compile project.
Step 5: Choose the build configuration (hardware platform, number of slots and firmware version) and start the build process. The process would then generate the bitstream that can then be deployed on to the Moku on the Cloud Compile slot.