# Getting Started with LabVIEW
The Moku Scripting API for LabVIEW includes VI’s for performing Moku instrument operations, as well as examples that demonstrate the use of these instruments through LabVIEW. Download the VI package (opens new window) and follow the install instructions below.
The LabVIEW Setup Guide covers:
- Requirements
- Installing LabVIEW Driver
- Introduction to LabVIEW Palette & Simple Example
- Building your first Moku LabVIEW Project
# Requirements
- LabVIEW version 2016+
- Knowledge of your Moku's IP Address
- MokuCLI
MokuCLI requirement
From MokuOS versions 4.3.0 and newer, the LabVIEW driver requires MokuCLI to download and manage bitstreams.
# Installing LabVIEW Driver
# 1. Install VI Package Manager (VIPM)
VI Package Manager (VIPM) is a community and tool that manages LabVIEW Add-ons. Liquid Instrument's LabVIEW Driver is available on VIPM. The VIPM Desktop App can be downloaded here (opens new window).
# 2. Install the LabVIEW Driver
Once VIPM is installed. Please run the VI Package file provided from us and install the LabVIEW Driver.
# 3. Install the MokuCLI Utility
Install MokuCLI by downloading the installer from Utilities (opens new window). You can easily check that the installation succeeded by running the command listed below from your command line. If the output begins the same as the output shown below, then the installation has succeeded. Read more about MokuCLI (mokucli) command line features.
$ mokucli --help

 Usage: mokucli [OPTIONS] COMMAND [ARGS]...

 Moku command line utility

 Version: 4.3.0.0

 (c) Liquid Instruments 2016-2026
...
2
3
4
5
6
7
8
9
10
If the output does not match above, please refer to our Knowledge Base (opens new window) for troubleshooting.
Note
It's important to make sure that the MokuCLI installation is in the same environment as, or is accessible by the moku package. Please refer to Installation and troubleshooting of MokuCLI (opens new window) for more information.
# 4. Download the data files
The Moku Scripting API for LabVIEW requires data files to be downloaded before any program can be run. These data files could be up to few gigabytes.Please ensure you have a suitable internet connection before you proceed, this step is only required to be run whenever you install or upgrade the library.
You can download the files using mokucli instrument download, read more about
MokuCLI.
# download instrument bitstreams for MokuOS 4.3.0
$: mokucli instrument download 4.3.0
ℹ Resolved Version 4.3.0 to instruments build 21047
  Downloading 542 bitstream(s) matching 'all'... ━━━━━━━━━━━━━━━━━ 100% 0:00:00
✓ Downloaded 542/542 bitstream(s)
2
3
4
5
If you see an error message, refer to the Troubleshooting section below.
# Introduction to the LabVIEW Palette

After successfully installing our LabVIEW Driver. The Moku palette can be accessed under Liquid Instruments Moku in LabVIEW's functions palette. The Moku palette includes a Moku folder and a number of Instrument folders.
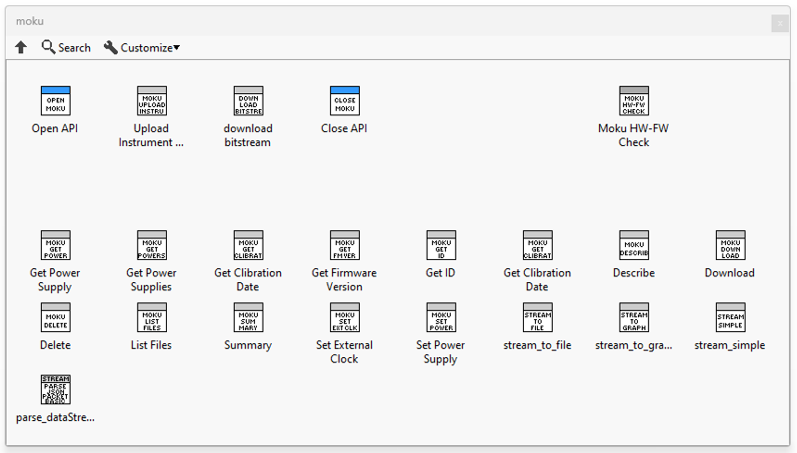
# 1. Moku
The Moku folder contains general function VI's for performing core Moku functions. Some of these include:
- Open Moku - for beginning a Moku-client session
- Upload Instrument - for uploading instrument data
- Moku HW-FW Check - for configuring Moku device and downloading bitstreams if needed
- Close Moku - for ending a Moku-client session
- Describe - for describing the Moku's hardware, firmware and API Server version
- Download - for downloading files from Moku
- download bitstream - for downloading bitstreams for a specific firmware version
- List Files - for listing files on Moku
- Delete - for deleting files on Moku
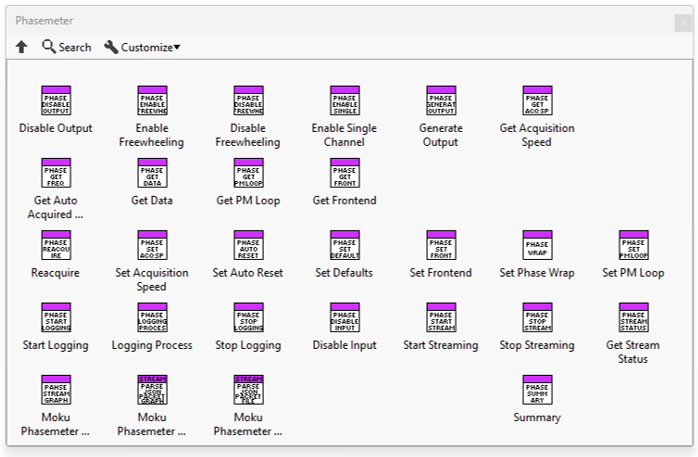
# 2. Instrument Functions
In each instrument folder, there exists VI's for performing functions for that instrument. Below shows an example of the Phasemeter palette and all its functions.
# 3. Waveform Generator Example
To demonstrate a simple use of the LabVIEW API, we will start by building a Waveform Generator example.
First, begin a Moku-client session using Open Moku VI, with your Moku's IP-address as input. Then, connect the client and error terminals to Upload Instrument VI. Create a constant on Upload Instrument VI's input terminal, and select the instrument to deploy. After that, connect the client and error terminals to an Instrument VI to perform its function. For our example, we have chosen to use Waveform generator's Generate Waveform VI, create controls on the inputs that you would like to control. Finally, add Close Moku VI to end the client session and create an indicator on the error output so error messages can be displayed on the front panel.
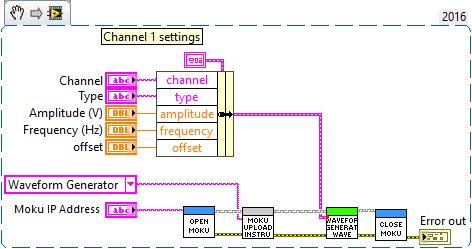
This is a VI Snippet of a simple Waveform generator example, it can be used directly if you have the LabVIEW Driver installed. To use the snippet, right-click and save the image, then drag the image file onto your LabVIEW diagram to use.
# Building your first LabVIEW Moku project
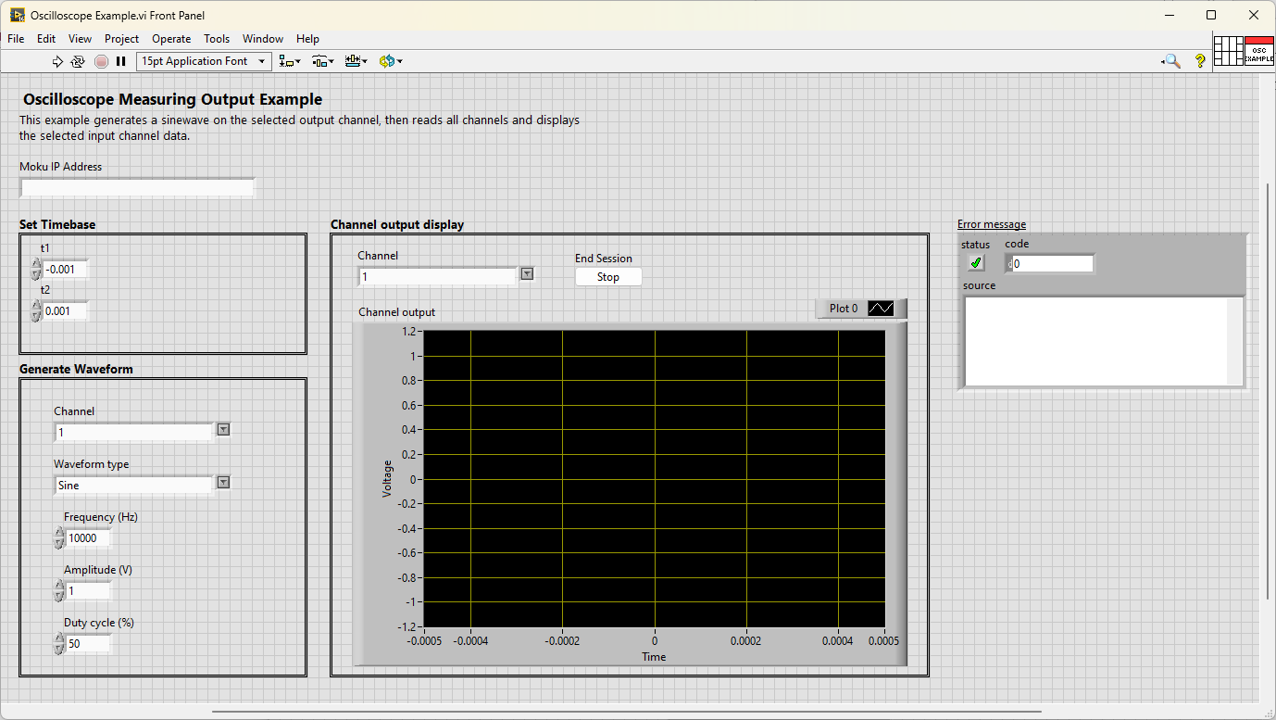
This part of the documentation outlines useful steps for developing Moku projects on LabVIEW. The following example demonstrates how to use Moku's Oscilloscope through LabVIEW to create an output sinewave and then read and display the sinewave on a front panel graph.
The VI Snippet of the example is available here.
# 1. Begin Moku-client session
To begin your LabVIEW Moku project. First, create a client session with Open Moku VI, enter your Moku's IP address through the input terminal (For details and options for finding your IP Address, see Finding your IP Address). Then, wire the VI to Upload Instrument VI by connecting the client and error terminals together.
Create a constant on Upload instrument VI's input terminal, and select the instrument you would like to deploy. For our example, "Oscilloscope" is selected.

# 2. Add instrument functions
After creating a Moku-client session and deploying an instrument. We can now perform the instrument's functions.
For this example, we will configure the Oscilloscope's timebase. Then, we will generate a waveform on the output channel, while Get Data displays the time-series voltage data on our front panel graph.
Similar to Open Moku and Upload instrument VI, the client and error terminals need to be connected and passed onto each VI. The Oscilloscope operations can be displayed as below:
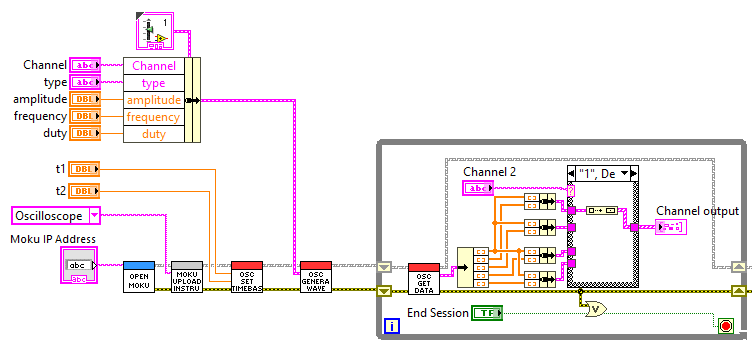
Controls are created on the VI's so these parameters can be easily adjusted on the front panel. The Oscilloscope Get Data VI has been put in a while-loop, so the time-series voltage data can be constantly updated on the front panel graph.
The front panel for our example is constructed as follows:
# 3. Closing Moku-client session and Error display
Finally, end the Moku-client session by using Close Moku, this closes the connection with your Moku and allows it to be connected by another client.
Please also create an indicator for the error output terminal on your final operation for displaying error messages.

# 4. Ready to run
Congratulations! You are now ready to run your first LabVIEW Moku project. We hope this is a helpful guide for our LabVIEW API!

This is a VI Snippet of the Oscilloscope example, it can be used directly if you have the LabVIEW Driver installed. To use the snippet, right-click and save the image, then drag the image file onto your LabVIEW diagram to use.
# Instrument Examples
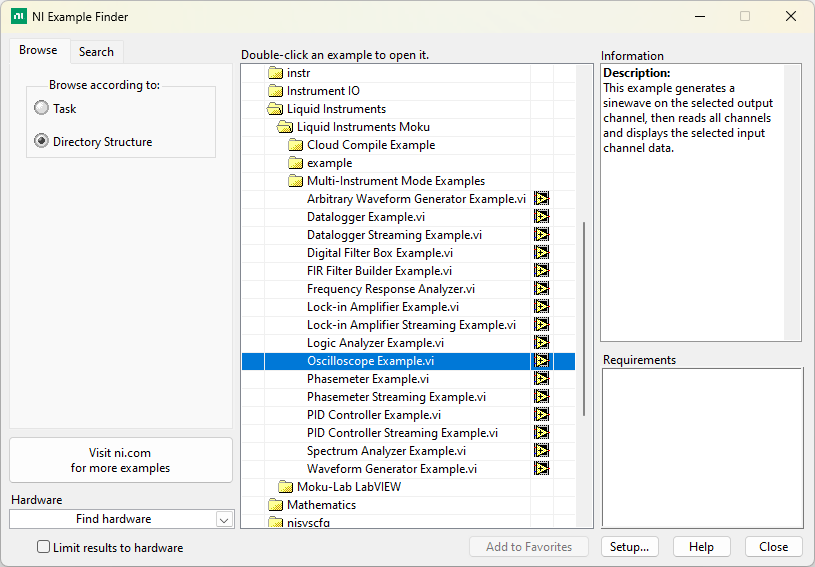
You can find example code for many of the instruments in the LabVIEW examples folder under the Liquid Instruments folder. You can also access the example files through the NI Example Finder. Switch to the directory structure view, then look for the Liquid Instruments Moku folder.
The instrument vi examples are a good place to start when building your own custom development.